Mastering the 3M PPS 2.0 Conversion for Fujispray Turbined Sprøytepistoler
, by Vidar Berg, 11 min reading time
, by Vidar Berg, 11 min reading time
Make your Fujispray turbine gun cleaner and faster with a 3M PPS 2.0 conversion. Follow the step-by-step adapter setup, best practices, and troubleshooting tips for consistent finishes and less waste.

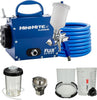
The 3M Paint Preparation System 2.0 is a disposable cup-and-lid system designed to simplify mixing, filtering, spraying, and cleanup. It replaces traditional rigid cups with a liner-based setup that supports consistent fluid delivery, even at varied spray angles. For anyone planning a 3M PPS 2.0 conversion, the biggest shift is moving to a sealed, modular workflow. You mix directly in the liner, lock in the lid with an integrated filter option, and connect to your gun via an adapter. The result is a cleaner process with fewer transfer steps.
Upgrading through a 3M PPS 2.0 conversion can reduce cleanup time, lower solvent usage, and help you maintain more consistent material control. The system supports faster color changes because you can swap liners and lids instead of washing a hard cup each time. Many painters also see fewer contaminants in the paint path since you reduce open exposure during mixing and pouring. If you manage recurring jobs, the PPS 2.0 approach helps standardize your routine and makes repeatable results easier to achieve.
Fujispray turbined sprøytepistoler can pair well with PPS 2.0 when you select the correct adapter and cup size for your gun and typical material volume. A successful 3M PPS 2.0 conversion depends on matching thread type, sealing surfaces, and clearances around the air cap. Before ordering, confirm the exact gun model and check whether your setup needs a dedicated spray gun conversion kit or an adapter only. When you choose correctly, you gain a compact cup system that suits turbine-style spraying and mobile workflows.

A spray gun conversion kit typically includes the PPS 2.0 adapter that connects the disposable cup system to your gun, plus supporting parts depending on the variant. For a 3M PPS 2.0 conversion, the adapter is the key component because it determines alignment and sealing. Choose a kit based on your gun’s inlet thread and geometry, not only on brand name. If you spray primers, basecoats, and clears, consider keeping spare adapters or seals to avoid downtime during peak work.
To complete a 3M PPS 2.0 conversion and start spraying, assemble the liner inside the hard cup, then add material and mix to spec. Fit the lid, lock the collar, and check that the seal sits evenly. Attach the adapter to your gun, then connect the cup to the adapter and tighten to a firm, even feel. Do a short test spray to confirm flow and pattern. If you are learning how to use 3M PPS 2.0, start with small batches to refine viscosity and gun settings.
For the smoothest 3M PPS 2.0 conversion, standardize your cup size and filtering approach across common jobs. Label liners by product and mix ratio to prevent mix-ups and speed up repeats. Keep your adapter threads clean and avoid overtightening, which can damage seals and cause intermittent leaks. If you use turbine systems, pay attention to atomization and fluid control, then adjust gradually. A consistent setup routine helps you avoid chasing spray issues that come from assembly variations.

In automotive workflows, time and cleanliness influence finish quality. A 3M PPS 2.0 conversion supports faster material changes between sealer, base, and clear, which helps when you work around booth schedules. Because you mix and spray from the same container, you reduce handling and cut the chance of introducing dust. This matters for spot repairs and panel blends where consistency is critical. When paired with strong automotive paint prep solutions, PPS 2.0 can help you keep each step controlled and repeatable.
Reducing waste starts with measuring accurately and mixing only what you need. The 3M PPS 2.0 conversion makes that easier because liners handle small batches well and allow quick swaps without a full cup wash. You can also improve application quality by maintaining a stable paint path with fewer transfer pours. That means fewer bubbles, less skinning in the cup, and more predictable viscosity during the job. Over time, better control can translate to fewer reworks and more consistent gloss and coverage.
Cleanliness affects every finish, from adhesion to final appearance. With a 3M PPS 2.0 conversion, you limit open-cup exposure and reduce drips during transport from mixing bench to spray area. After spraying, you can cap or remove the liner quickly, which helps keep leftover material contained for proper disposal. Pair the system with disciplined surface prep, tack cloth use, and dedicated mixing zones. These automotive paint prep solutions work best when your mixing and spraying process stays contained and organized.

Unveiling the FUJISPRAY Q5 Platinum Series: Precision and Power for Professional Results
The reliability of a 3M PPS 2.0 conversion comes from consistent fit and a repeatable seal when you assemble the components correctly. The hard cup provides structure, while the liner keeps the paint path fresh each time. That combination reduces the variables that often cause contamination or inconsistent flow. If you spray frequently, reliability also means fewer interruptions for cleaning and troubleshooting. With correct storage and careful assembly, PPS 2.0 supports dependable performance across primers, topcoats, and clears.
Cost-effectiveness is more than the price of consumables. A 3M PPS 2.0 conversion can lower solvent consumption, reduce labor time spent cleaning, and help minimize rework due to contamination. Those savings often matter more than per-liner cost in a busy shop or a serious DIY garage. The long-term value improves when you standardize your process and maintain your adapter properly. When you treat the system as part of your workflow, it becomes a practical upgrade rather than an added expense.
Painters often praise PPS 2.0 for faster turnaround and simpler cleanup, especially when they run multiple colors or coatings in one session. Many reviews also highlight improved convenience for mobile work because the cup system travels cleanly and reduces spills. When you evaluate feedback, focus on comments related to your use case, such as turbine spraying with Fujispray turbined sprøytepistoler. If users mention fit issues, they usually trace back to choosing the wrong spray gun conversion kit or skipping seal checks during a 3M PPS 2.0 conversion.

If you see leaks after a 3M PPS 2.0 conversion, recheck the adapter seating, collar lock, and lid alignment. Uneven tightening often causes small air gaps that lead to drips or sputter. If flow seems restricted, confirm the filter choice and inspect for collapsed liners caused by improper venting or overly aggressive tightening. When atomization looks inconsistent, revisit viscosity and gun settings before blaming the cup system. Small, systematic checks usually solve issues quickly.
Even with disposable liners, your adapter and gun connection points need regular care. After each session, wipe the adapter threads and sealing surfaces, then store parts in a clean, dry container. Replace worn seals as soon as you notice flattening or nicks, because small defects can undo the benefits of a 3M PPS 2.0 conversion. Keep consumables sealed until use to prevent dust contamination. This routine supports consistent performance and extends the life of your reusable components.
To get the best results with Fujispray turbined sprøytepistoler, balance fluid delivery with turbine air volume and keep your materials within the recommended viscosity range. After your 3M PPS 2.0 conversion, run a quick test pattern on a card to confirm fan shape and coverage. Adjust fluid first, then refine technique with distance and overlap. If you need to reconfigure often, keep notes on settings for primers and topcoats. When you’re ready, selecting the right spray gun conversion kit and replenishing PPS consumables helps you stay consistent on every job.